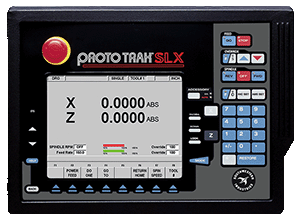
Pat goes over the Thread Repair function on a ProtoTRAK SLX Lathe. A few inputs into the SLX control will make easy work out of manual threading and thread repair. Found in the DRO Mode under Do One features, Thread Repair allows you to pick up and remachine threads in a quick, easy process. The machine in this video is the ProtoTRAK TRL 1845SX Lathe by TRAK Machine Tools.
Hey Everybody, this is Pat Fitz from TRAK Machine Tools and today's video is going to be on Thread Repair in an SX Lathe Control. As you can see from the part I'm holding in front of me, this is a 7/8 diameter rod that has an inch and a half thread which is a 3/4 inch 10 thread pitch, and what I want to do is recut this even though it's been taken out of the part already. So what I need to do in this case is I got to put it in the machine, I got to tell the machine where it is, pick up the thread and then cut it. So I'm gonna start by putting this back where it was.
Obviously, because the part was made at a previous date, the machine has no way of knowing where the actual thread is compared to the encoder on the spindle. So I'm going to have to tell it that part. Well, what I'm going to do first is I'm going to go to the DRO mode and I'm going to select the DO ONE features and the fifth button on here says THREAD REPAIR. What it wants me to do is to explain to it the type of thread that it is I'm trying to repair.
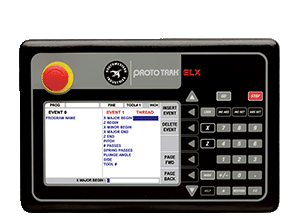
Now when I'm doing this kind of thread, there's a really good chance that I might have to cut it more than once so I prefer to use the custom threading option which you'll find under the HELP key. And it's asking me, "Do I want to do a custom thread?" I'm going to say YES. Alright, so first question: What's the Major Diameter? It's a 3/4 inch thread, so I'm going to start out with 0.75, I'm going to start out at Z zero, and then my Minor Diameter standard would be 0.6565 and my Major Diameter at the other end of the thread is also going to be 3/4, okay?
Length of the thread: -1.5 inches. And then the Pitch of the thread is determined by how many threads there are per inch. There's 10 threads per inch on this particular part, so that would make the Pitch 0.1 Number of Passes would be how many cuts I want to take for my actual threading process. I'm going to do it in 8. I'm going to do 1 Spring Pass for when I get to the final depth. My Plunge Angle would normally be 29½°, but because I'm trying to pick up a thread that was cut previously, I'm going to keep that at 0 so it plunges straight in, so I'm going to leave that at 0. I'm doing Outside Thread so number 2. Number of Threads: It's a Single Lead Thread, so 1. I'm doing a 300 RPM and I'm using Tool #3 because Tool #3 is already set up in my tool or in my machine. And I want you to understand that your Thread Tool Setup is the same as it would be any other time you're using the machine.
So you'll notice here I have a green box that's asking me to turn on the spindle so that it can read the encoder. And it's also reminding me to make sure that when it stops, just not to back up any. If your machines a little older you'll find that it runs a little looser in the spindle, therefore, it does have a tendency to relax when it stops. So just turn your spindle on, and then shut it off and just watch it as it continues. So right there that looks perfectly fine. Okay, so it's telling me to move to the NEXT step. When I go the next step, now it's asking me to manually set the tool up inside of the threads so that I can get the best thread possible, okay? The way I do this is I'll usually use a piece of paper or something to put behind the thread in the tool so I have a better contrast of how I'm doing this.
If it's a really tight thread, you might even want to use a magnifying glass or something like that so you can see it even better. Okay, this is a fairly strong thread so I think I can do it by hand Okay, so at this point I've got the tool set in the middle of the thread and it's telling me to hit the Absolute Set key (ABS SET). Then it's just telling me to back it away both in X and in Z. So I want to get it out past the end of the part so it has a starting point. And then once I do all those things, I push NEXT and it says, "okay, when you're ready to cut the thread push GO." Alright, so I select GO right here, it moves over to where it wants to begin, reminds me to put in the right tool, and it tells me you start the spindle, and then push GO.
So as you can see in the video right now, it's cutting the thread and it's chasing what was previously there. My thread doesn't have a weld in it so you're not going to hear it picking up that part of it but that's actually a good sign. That means I did a pretty good job of getting it lined up in the first place. And once it's done it shuts off and it's ready to do another part. Okay, now in some circumstances you're going to have a point where after you thread this you're gonna see that the threads too tight still. If that's the case, all I have to do is push the BACK button 5 times (correction: 4 times), that'll take me back to where I actually programmed this. I would come down to my Minor Diameter and change this number.
Let's say that we want to make it 3 thousandths less, so instead of 0.6565 we're gonna go to 0.6535 0.6535, right? And then, I would just go forward (PAGE FWD) and just push the NEXT button until I get back to where it's asking me to push GO, right? At that point I would push GO, turn on my spindle again, and let it cut. And now it's gonna cut the same thread again. So I can go backwards and forward as many times as it takes until I get it where the nut actually fits correctly on the thread. And then once that's all done, I'm ready to move on to my next job.
I hope this is very helpful for you guys and you'll see us in the next video. Thanks for watching!